


(Scroll down to the bottom of this post for our brew guide!)
The Moka Pot, in all of its elegance and sophisticated design, is still shrouded in mystery as a coffee brewing method. In recent years, it has taken a back seat to modern “third wave” style brewers that we’ve come to be spoiled by in our kitchens and favourite cafes.
After years of avoiding building up a collection of coffee implements at home, I received a Moka Pot as a gift, and my collection has since spiraled beyond my control.
Although not as subtle as modern brew methods, nor as technique-dependent, the Moka Pot has quickly become my favourite way to brew at home when I am craving the rich, luxurious texture and flavour profile of espresso.
After experimenting with many variables, including the recommended methods of my respected peers in the industry, I’ve come to understand the following:
The Moka Pot produces all types of coffee and flavour-profiles, and just as much as you can calibrate any other specific brew recipes to your personal tastes, narrowing down the details of your Moka Pot technique will keep things easy, and consistently delicious.
These recommendations ignore most Moka Pot conventions but part of the beauty of coffee is the experiment (not to mention the results).
These are some elements of my Moka Pot recipe that I’ve developed to optimize for sweetness, balance, complexity, and mouthfeel:
Grind
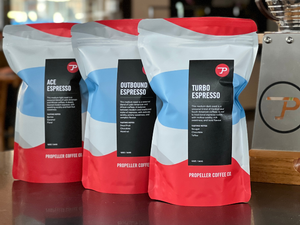
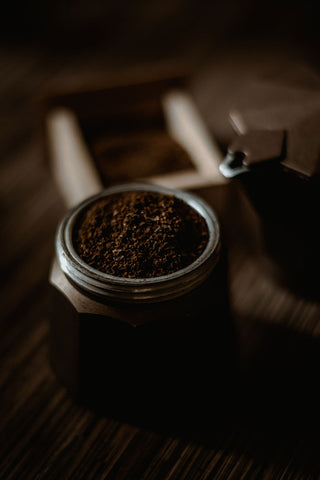
Start with about 30g of coffee for a 4-cup Moka Pot. I prefer our Turbo Espresso because the rich, chocolatey, and nutty flavour profile works really well in this brewer.
Grind about as fine as espresso - a fine, fluffy consistency that “paints the finger”.
Conventional recipes suggest a medium-fine grind (coarser than what I recommend here), but I find this grind yields a cup more like a really strong drip coffee instead of an espresso.
Two crucial elements to this method: distribution and tamping
Pour your grinds into the metal filter and “tap’” firmly - think light karate chops - yet evenly around the sides of your filter until the bed of coffee is levelled. Then, use the edge of your finger to lightly break up all the clumps that may have collected on the bed’s surface until it looks smooth, and all clumps are now loose grains. This will help prevent channelling (water passing through gaps in your coffee bed without dissolving any flavour compounds) and also bring out the full spectrum of flavours your coffee has to offer.
This is where things start to really break the rules:
To further mimic the espresso effect, I tamp my bed of grinds as I would an espresso shot on an espresso machine. I like to use the rubberized end of my Aeropress plunger, but any flat, non-reactive implement that fits flush into your metal filter should work. Tamp until you feel the coffee compress itself, lift your makeshift tamp, and admire how flat your coffee bed is. Your coffee bed should have some headroom from the surface of the bed to the lip of the filter.
I understand that this goes against virtually every piece of Moka Pot advice, but tamping my coffee bed when using a Moka Pot was a game-changer in my quest to find an espresso-like Moka Pot method. Try it out. Experiment. Live your life.
Water and Ratios
Chances are your favourite coffee shop calibrates (“dials in”) their espresso recipe at least once a day.
When baristas are dialing-in, they are focussing on the proportion of coffee grinds to brew water (usually 1:2 for espresso).
For this Moka Pot method, I recommend a 1:3 ratio. (30g of grinds, 90g of water for a 4-cup Moka).
I find this strikes the balance of a sweet, rich shot. This will change depending on the coffee that you are using, so again, use this as a starting point and experiment.
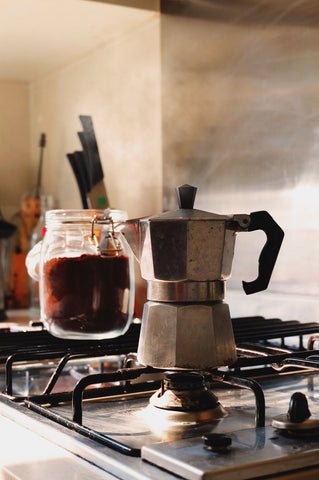
After you’ve added your coffee, heat your metal filter (carefully) with hot water without getting your grinds wet. I like to rest it upright in a short mug so I can easily retrieve it before it gets too hot.
Then weigh out 90g of hot water in your reservoir - I always recommend using water just off the boil (96℃, 205℉). For this step, use a scale! If you don’t have one, you can pour ¼ inch below the valve on your reservoir).
Next, quickly assemble all parts, carefully screwing on the brew funnel, and turning your stove top up to medium (or, on your camping grill, so the flame is only barely-touching the bottom of your pot).
Steeping
I like to keep the lid of my Moka Pot open so I can observe what’s going on with it - I watch my brew like a hawk once coffee starts to pulse from the funnel. If it is bubbling or sputtering aggressively, turn your heat down. If the brew is only barely brewing, turn your heat up slightly.
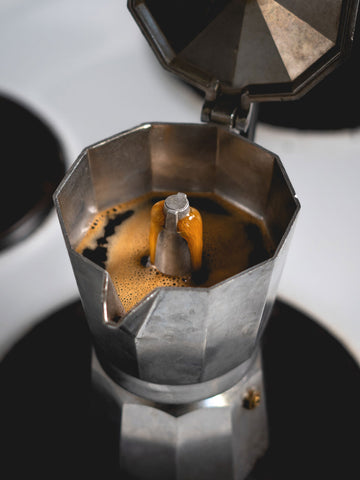
Stop the brew just as the foam coming out of the funnel becomes honey brown, then pour and serve immediately so the Moka Pot doesn’t continue to cook the coffee.
Don’t be afraid to experiment with this beautiful, ingenious brewer.
A few final parting words of advice:
- Don’t get discouraged if your first batch could be better, change one variable, and try again.
- No matter what size of Moka Pot you’re using, the recommended ratios will work. Tweak as you see fit. Remember, the process and experimentation is all part of the fun.
Try out these tips, tag us in your #mokapot stories (@propellercoffeeco), and tell us how you make your Moka!
- Grind coffee to a fine texture that paints the finger
- Insert coffee in metal filter
- Distribute and tamp grinds as evenly as possible
- Pre-heat bottom of filter with hot water
- Pour 90g of hot water (96℃ / 205℉) into Moka Pot reservoir (just below the one-way valve)
- Assemble Moka Pot
- Heat Moka Pot assembly over medium heat with lid open, adjust heat as necessary
- Observe top of the funnel as the coffee brews
- Once the coffee foams honey brown, remove from heat and serve immediately